CloudFlare and KeyCDN, the perfect couple for PrestaShop?

Over the years, CloudFlare has established itself in the world of CDN and site performance.
If in the past I was able to explain why you could do without them if your business was purely domestic or at least in the country where your store is hosted, the situation and usage has changed regarding these CDNs.
I experimented for you, a couple of CDN to get the best configuration in terms of performance, respecting the guidelines of the testing tools and also respecting your wallet.
Presentation of the services used
CloudFlare
CloudFlare is much more than a CDN but do we still need to talk about CloudFlare when very good articles exist on the subject as webbax did on his site: https://www.webbax.ch/2020/02/27/avec-cloudflare-votre-prestashop-ne-sera-plus-en-100eme-page-de-google-ep-49/
In our case, for economic reasons, I will only talk about the free version of CloudFlare.
This solution integrates the basics of security and especially the management of your domain name's DNS, because that is the real strength of CloudFlare.
Depending on your host and especially on the organization managing your domain name, it will take more or less time to take into account the new DNS set up by CloudFlare, but CloudFlare will correct this delay, allowing you to manage your DNS in CloudFlare and to take into account the changes quickly, which can be a big plus when migrating from one version to another or from one host to another.
This solution is perfect to avoid DDOS attacks with a simple system to activate in case of attack, CloudFlare is also a powerful, complete and accessible technical product if you take the time to refer to the documentation or if you share its management with your technical provider.
So get into the habit of managing your DNS on CloudFlare even if you only use it for that, so you will adopt the best practices to quickly apply your DNS changes.
That's it, that's all on the CloudFlare topic because as said before, everything has already been published on the subject, so I'll let you dive into the other articles on the subject.
KeyCDN

With KeyCDN, we really get into the management of a real CDN, as I imagine it, which will take all the elements available online on your store to make them available in the best conditions to your customers.
CloudFlare can have the same functioning, but you will understand, by reading the whole article, why I decided to couple the two services.
It is this kind of service that allows you to add media servers in the configuration of the Performance menu of your store.

With KeyCDN you will be able to create a Pull Zone very easily without any technical knowledge.
Registration on KeyCDN
Sign up for KeyCDN for free and take advantage of the $10 credits offered when you sign up to activate your CDN very quickly and see the improvements offered by this system right away.
Creating your first Pull Zone
Once you have registered, simply select Zones from the side menu and click on the Add Zone button.


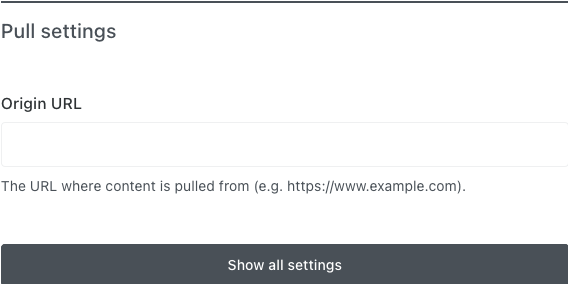
It is not necessary to unfold the advanced settings as they will not serve you initially and should be handled by someone who knows what they are doing, you can come back to them after training by referring to the documentation offered by KeyCDN

And at the end of this procedure, you just have to click on the Save button so that the creation of your Pull Zone is initiated.
Recovery of your elements
From now on, all you have to do is wait a few minutes for your site's files to be repatriated to your zone and distributed to all their servers around the world.
Wait until the little orange dot turns green.
Configure PrestaShop with this Zone
Go to the Advanced Settings >> Performance page and fill in the url of your Zone created just before in the first media server.

Make sure to remove the https:// at the beginning of the url.
And don't forget, you need to enable Smartcache for concatenation to work and Prestashop uses media servers to broadcast your static files.
From now on, all static files supported by your Prestashop installation will be processed by your media server, i.e. js, css and image files.
Improve image weight effortlessly
One of the features I love about KeyCDN is the post-processing of images which can be very advanced, but in the context of Prestashop you have to be careful about several things.
If you have configured your installation to accept PNG images, then you may encounter a problem with these images if they are processed by KeyCDN, because Prestashop always uses the JPG extension to display images and in post processing the alpha zones (transparency) defined on a PNG disappear and are replaced by black.
To correct this problem, I found a two-in-one solution.
KeyCDN offers images in a modern format, WEBP, the lightest format specially developed for the Internet.
To do this you will need to make a small modification to your theme.
Go to your tpl files and for all the images, at the end of the call of the url you just have to add the following code:
?format=webp
Automatically, KeyCDN will broadcast images called with this code in their WEBP format url, which is a huge weight saving and will delight all known test sites to date.
For example, for the logo of the site we will simply pass from this code :
<img class="logo img-responsive" src="{$shop.logo}" alt="{$shop.name}">
to this one:
<img class="logo img-responsive" src="{$shop.logo}?format=webp" alt="{$shop.name}">
Create your account and test KeyCDN for free (+$10 free)
Why couple these two CDNs?
I'm going to answer this question directly:
For an economic reason.

KeyCDN's daily processing cost is much lower than CloudFlare's, but be aware that after a certain volume of visits to your site, CloudFlare becomes more competitive.
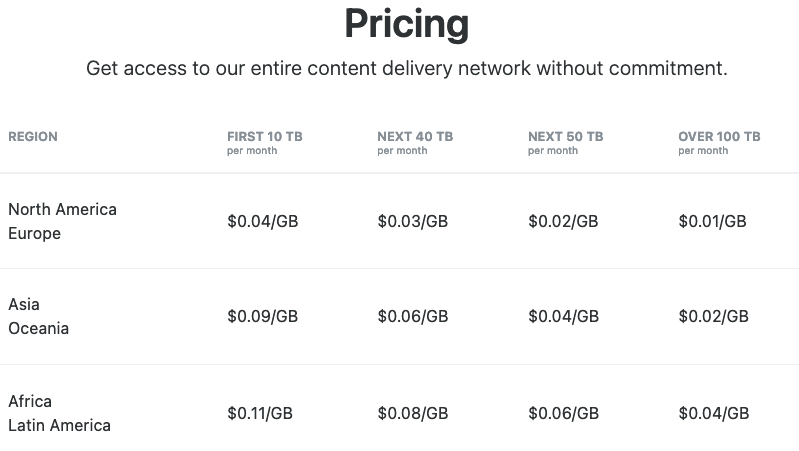
To see this, run the CloudFlare part for free and look at the volume of data processed and report the information on the KeyCDN pricing schedule, for the majority of stores, KeyCDN will be more advantageous, but some will prefer to settle for CloudFlare to have only one entity to manage.
Conclusion
Personally, I have implemented this configuration on my Prestatoolbox.co.uk and Prestatoolbox.com domains for a reasonable day-to-day cost and a significant performance and stability gain.


Just looking at these results one might think that only KeyCDN would be necessary, but the use of CloudFlare brings so many advantages in its free offer that it would be a shame to go without it.
You can also play on different elements to improve the visit of your customers with my module allowing, for example, to pre-load the page just by hovering over the links and make it almost instantaneous for your customers to change pages in your store.
I hope this article has shed some light on the subject of your store's performance and security.
If you wish that I accompany you on the installation of this solution, do not hesitate to make a direct request.
Comments